To start playing your first notes on the flute, first, assemble your instrument with care. Hold the flute horizontally, resting your left hand near the mouthpiece and using your right hand for support. Focus on your breath—take deep breaths and direct air across the embouchure hole. Begin with simple scales, like C major, to improve finger coordination and tone. With practice, you’ll master your first melodies. There’s plenty more to learn, so keep exploring your flute journey!
Key Takeaways
- Begin with the C major scale to develop finger coordination and tone quality.
- Practice simple melodies like “Mary Had a Little Lamb” for note transitions.
- Ensure fingers cover tone holes completely to avoid air leaks.
- Focus on breath control and proper embouchure for clear sound production.
- Set aside daily practice time to reinforce skills and improve technique.
Getting to Know Your Flute: Parts and Assembly
Getting to know your flute is an exciting first step in your musical journey. Understanding flute anatomy is essential for getting the most out of your instrument. Your flute consists of three main parts: the headjoint, body, and footjoint. Each part plays a vital role in producing sound and should fit together seamlessly.
When assembling your flute, start with the headjoint. Gently twist it into the body, aligning the embouchure hole with the center of the keys. Next, attach the footjoint to the body, ensuring it’s securely connected.
Remember to handle each part with care to avoid damage.
As you explore your flute, don’t hesitate to ask questions and seek guidance from fellow musicians. They understand the journey you’re on and can offer valuable support.
Embrace this learning process, and soon you’ll be creating beautiful music!
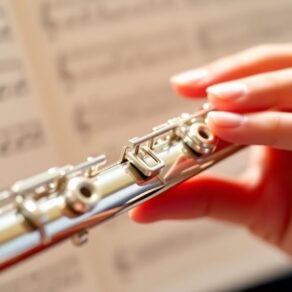
How to Hold Your Flute Properly
Holding your flute properly is crucial for both comfort and sound production, and it can greatly enhance your playing experience. Start by positioning the flute horizontally to your right. Your left hand should be closer to the mouthpiece, while your right hand supports the body.
For an effective flute grip, use your left thumb to support the flute underneath. Your fingers should rest gently on the keys, with your index finger slightly curved. Avoid excessive tension; a relaxed grip allows for better movement and sound.
With your right hand, let your thumb rest on the back of the flute, providing stability. Your fingers should align naturally with the keys, ensuring easy access.
Take a moment to adjust your hand positioning until it feels comfortable. Practicing this technique will help you feel more connected to your instrument, fostering a sense of belonging in your musical journey.
Let’s Make Some Sound: Your First Flute Techniques
Now that you’re comfortable holding your flute, it’s time to produce some sound! Start by focusing on your breath control. Take a deep breath, filling your diaphragm, and exhale steadily while directing your airflow across the embouchure hole. This may take practice, but don’t get discouraged; it’s all part of the learning process!
Next, pay attention to your finger placement. Ensure your fingers cover the tone holes completely, creating a seal. You can experiment by lifting and lowering your fingers to see how it affects the sound.
As you blow into the flute, maintain consistent airflow and adjust your embouchure—slightly pouting your lips can help. Remember, it’s normal to struggle at first; each sound you produce is a step closer to mastering your flute.
Keep practicing, and soon, you’ll be making beautiful music!
Your First Flute Notes: Easy Exercises
Once you’ve mastered producing sound on your flute, it’s time to learn your first notes!
Begin with beginner scales, like the C major scale, which consists of the notes C, D, E, F, G, A, B, and C. These scales are essential for building your finger coordination and tone quality. Practice slowly and steadily, ensuring each note rings clear.
Next, try playing simple melodies, such as “Mary Had a Little Lamb” or “Hot Cross Buns.” These tunes aren’t only fun but also help you familiarize yourself with note transitions.
Set aside a few minutes each day to practice these exercises.
Common Flute Problems and How to Solve Them
Many beginner flutists encounter common issues that can hinder their progress.
Don’t worry; these problems can be solved with some simple flute maintenance tips.
Here are a few common issues you might face and how to address them:
- Sticky keys: Clean with a soft cloth or take it to a technician.
- Air leaks: Ensure your fingers cover the holes completely.
- Unclear sound: Check your embouchure and breath support.
- Out-of-tune notes: Regularly check your flute’s tuning and adjust as necessary.
- Dents or damage: Handle your flute carefully and store it properly.
Frequently Asked Questions
How Do I Clean My Flute After Playing?
After playing, you should clean your flute to keep it in top shape.
Start with a cleaning rod and cloth to wipe the inside of the body. Use a soft cloth for the exterior to prevent scratches.
Regularly check for moisture and use cleaning tools designed for flutes.
Remember, proper maintenance tips include avoiding food or drinks near your instrument.
With these simple steps, you’ll ensure your flute stays beautiful and sounds great!
What Type of Flute Should a Beginner Purchase?
If you’re starting your flute journey, consider a student model like a Yamaha YFL-222 or Gemeinhardt 2SP. Did you know that about 70% of beginners prefer these brands for their reliability?
Beginner flute types usually include closed-hole or open-hole options; closed-hole flutes are easier for new players. These instruments not only make learning enjoyable but also help you feel part of a vibrant community as you grow in your skills.
How Long Should I Practice Daily as a Beginner?
As a beginner, you should aim for about 20 to 30 minutes of daily practice.
This practice duration is effective for building your skills without feeling overwhelming.
Focus on consistency, and don’t hesitate to break it into shorter sessions if needed.
Remember, it’s not just about the time you put in, but the quality of your practice.
Celebrate your progress, and you’ll find yourself enjoying your flute journey even more!
Can I Play the Flute if I Wear Braces?
Sure, you can totally play the flute with braces!
Just think of it as a musical game of patience. While braces adjustments might feel like a mouthpiece comfort battle, you’ll adapt.
Practice gently at first, letting your lips adjust to the hardware. Remember, many flutists have navigated this path before you, so embrace your unique journey.
With time, you’ll be playing beautiful melodies and making music with confidence!
What Are Common Mistakes Beginners Make With the Flute?
Beginners often face embouchure issues and incorrect finger placement. You might struggle to maintain a steady airflow or to close your fingers properly over the holes.
It’s essential to practice forming a good embouchure and ensuring your fingers are positioned correctly for each note. Don’t worry; these mistakes are part of the learning journey!
Keep practicing, seek feedback, and soon you’ll find your sound improving as you gain confidence and skill.
Conclusion
Now that you’ve taken your first steps with the flute, remember that practice makes perfect. Don’t be discouraged if you hit a few sour notes along the way; every musician has been there. Keep your chin up and stay committed to your journey. With time and patience, you’ll find your unique voice and create beautiful melodies. So grab your flute, keep playing, and let the music sweep you off your feet!